
Attenders are your organization's members, visitors, or prospects. In contrast to your organization’s Lights, attenders need to be manually added to your organization’s profile. This allows you to map the people in your church management software or database regardless of whether those individuals are using Blesseveryhome.com or not.
In order to be able to upload your members to your organization's account in Blesseveryhome.com, you'll need to prepare a spreadsheet in .CSV format that contains the information you would like to upload.
Each column should contain a different category of information and each row should contain the corresponding information for each individual member as seen in the example below.
The fields available are listed below. You do not need to have information for all of the following fields. Only the fields marked with an (*) are required to be able to view that record on the map:
To begin the process of adding your organization’s attenders using a .CSV file, click the ‘TOOLS’ icon at the top of the control panel.

Directly under your organization’s name, you will find a row of icons. Click the icon labeled ‘ATTENDERS’.
![]()
Click the button labeled 'CSV UPLOAD' that appears at the top of the next page.

Click the 'Choose File' button to open up a file browser window.

Locate the .CSV file on your computer that contains the attenders you would like to upload. This step may look different depending on your device and operating system.

Once the file has been selected, click the 'UPLOAD FILE' button.

Once the file is successfully updated, you will be taken to Step 2. Near the top of the page, you will be able to answer the following question: "Is your first row a header that doesn't include data?". You may choose 'No' if the document you are uploading does not have a header. By default, 'Yes' will be selected.
Click the drop-down arrow next to each field that you would like to match and upload. Each row in the list that appears is the data found in the first row for each column of the .CSV you uploaded. Match the field with the corresponding information from drop-down list. This will vary depending on whether or not your document has a header and what data the corresponding cells contain . Without the header that details each field, you will need to know what the information in the first row of each column represents and match it with the appropriate field. See the animations below for an example of each method.
When you are done, click the 'SAVE' button to proceed to the next step.

The file will be scanned and the fields will be matched. The next page will detail the number of rows being updated and will list any rows that are being skipped if there is an issue with the formatting of the document. If there are no issues and the page reads "File looks good". Click 'PROCESS FILE' to add the uploaded attenders to your organization's profile.

Clicking 'PROCESS FILE' will cause a loading box to appear in the center of the page. Be sure to not leave the page while the file is loading. Larger files may take longer to process.

When the processing is finished, you will be taken to a page with a message of success. Click 'GO TO ATTENDERS LIST' to finish the process.

For times where you only need to add a single attender, you can manually add them without using the upload process described above.
To begin the process of adding a single attender, click the ‘TOOLS’ icon at the top of the control panel.
Directly under your organization’s name, you will find a row of icons. Click the icon labeled ‘ATTENDERS’.
![]()
Click the 'ADD NEW' icon.

The fields available are listed below. You do not need to have information for all of the following fields. Only the fields marked with an (*) are required to be able to view that record on the map:
After filling out the fields, click the 'SAVE CHANGES' button to add that individual attender.

Repeat these steps to add multiple individual attenders. For larger uploads, please review the instructions for uploading attenders with a .CSV file.
We have integrated an API connection with Church Community Builder to allow those organizations who use CCB to easily sync their attenders with Blesseveryhome.com. Please see the following article for detailed steps:
Syncing your attenders from CCB
While on the map page, expand the 'My Church' or 'My Association' layer in the control panel by clicking the label.

Once expanded, click the 'Attenders' label.

Once expanded, the icons will appear on the map and you will see a list of your unique attender types in the control panel grouped by the 'member status' field. The icons will be shown as different shades of blue with the first two letters of that member status included making them easily identifiable on the map.
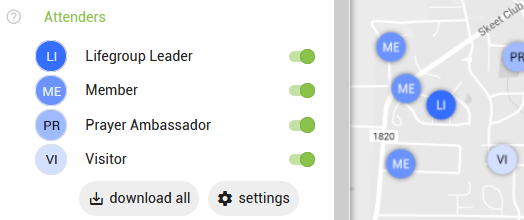
Click any of the green toggles in the control panel to filter out attenders with that 'member status'.

Click any of the attender icons on the map to see the name, address, and status of that member.
![]()
You can download all of your attenders currently displayed on the map by clicking the 'download all' button in the control panel. This will generate a .CSV file of the attenders. If you have any member status groups toggled off in your control panel, the download will only include the groups where the toggle is green or 'on'. In the image below, only attenders with the member status 'Member' will be included in the download.

You can also download attenders from a specific area by combining the instructions in the following articles:
You can delete your currently uploaded attenders
To begin the process of deleting organization’s attenders, click the ‘TOOLS’ icon at the top of the control panel.
Directly under your organization’s name, you will find a row of icons. Click the icon labeled ‘ATTENDERS’.
![]()
Click the 'DELETE ALL' icon.

You will be asked to confirm that you would like to delete all of your uploaded attenders. Click 'DELETE' to confirm this action.

If would you like to delete a single attender instead, you can click the 'delete' icon on that attender's box.

If you would like to edit an individual attender's information, click the 'edit' icon on that attender's box

If the household has been matched to a real household in our database, you may need to click the 'UNLOCK' button to be able to change the majority of the that attender's information.

If you make any changes, to the attender's information, be sure to click the 'SAVE CHANGES' button at the bottom of the page.